What is HTML?
HTML stands for HyperText Markup Language. It is the standard language used to create and structure content on the web. Unlike programming languages, HTML does not contain logic or calculations. Instead, it describes what content exists on a web page and what role that content plays.
HTML uses predefined elements to mark up content such as headings, paragraphs, images, links, and forms. These elements tell the browser how different pieces of content are related and how they should be interpreted. Every website you visit — from simple blogs to complex applications — uses HTML as its foundation.
Think of HTML as the skeleton of a web page. It defines the structure, while other technologies like CSS and JavaScript add styling and behavior.
HTML works by using tags to wrap content and give it meaning.
Example: A simple HTML paragraph
<p>This is a paragraph of text.</p>
In this example:
- <p> tells the browser this is a paragraph
- The text inside is the content
- </p> marks the end of the paragraph
Every website you visit is made up of hundreds or thousands of these HTML elements working together.
What HTML Is Used For
HTML is used to define the structure and meaning of content on the web. It tells the browser what something is, not how it should look.
With HTML, you can create:
- Headings and paragraphs
- Links between pages
- Images, audio, and video
- Lists and tables
- Forms for user input
Example: A heading and paragraph
<h1>Welcome to My Website</h1> <p>This website is built using HTML.</p>
Here:
- <h1> defines the main heading
- <p> defines a paragraph
- The browser understands the importance and role of each piece of content
Styling (colors, fonts, layouts) is added later using CSS.
How HTML Works in a Browser
When you open a web page, your browser requests an HTML file from a server. Once the file is received, the browser reads the HTML code from top to bottom and begins interpreting its structure.
The browser:
- Parses the HTML document
- Identifies elements and their relationships
- Builds a structure called the Document Object Model (DOM)
- Displays the content based on that structure
The browser does not “execute” HTML like a program. Instead, it interprets it and uses it as a blueprint for displaying content. If CSS or JavaScript is present, the browser applies those technologies after understanding the HTML structure.
Basic Structure of an HTML Document
Every HTML page follows a standard document structure. This structure ensures that browsers know how to correctly interpret the content.
At a high level, an HTML document includes:
- A document type declaration that identifies the file as HTML
- A root element that contains all page content
- A head section for metadata like page title and descriptions
- A body section where visible content lives
This consistent structure allows browsers and search engines to reliably understand web pages. Even simple HTML files follow this pattern, and learning it early will help you write clean and predictable code.
In the world of web development, HTML (Hypertext Markup Language) serves as the foundation for creating web pages.
We'll start with the essential structure of an HTML document, including the <!DOCTYPE> declaration, the <html> element, and the basic structure of <head> and <body>. You'll learn how to create a new HTML document and set it up correctly.
An HTML document starts with a <!DOCTYPE> declaration, which tells the browser the version of HTML being used. Following that, we have the <html> element, which serves as the root element of the HTML document. Inside the <html> element, we have two main sections: <head> and <body>.
The <head> section contains meta-information about the webpage, such as the title, character encoding, and external CSS or JavaScript files. The <body> section contains the visible content of the webpage that users will see and interact with.
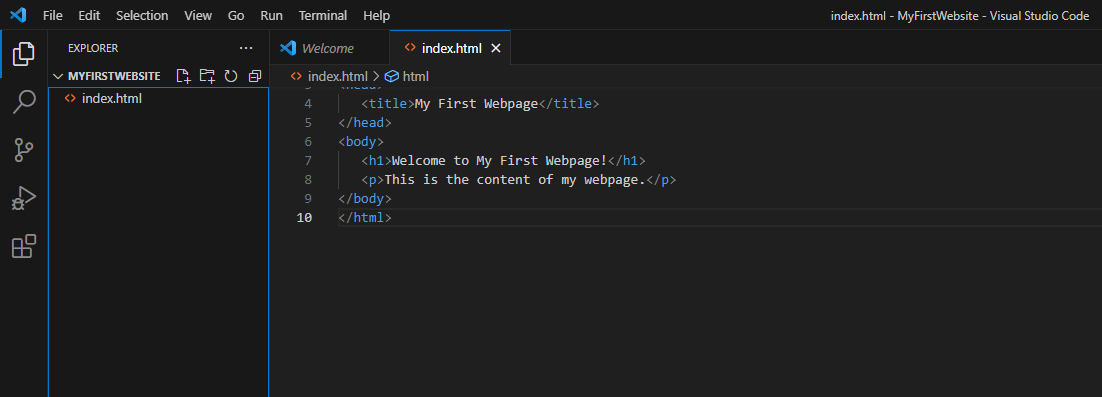
Now that we have a basic understanding of the structure, let's create our first HTML document. Open VS Code, which we installed in the previous section and create a new folder named MyFirstWebsite and add a file named index.html.
We'll start by setting up the basic structure of an HTML document.
<!DOCTYPE html>
<html>
   <head>
      <title>My First Webpage</title>
   </head>
   <body>
      <h1>Welcome to My First Webpage!</h1>
      <p>This is the content of my webpage.</p>
   </body>
</html>
The folder which we created (MyFirstWebsite) represents our website and the index.html page is our home page. In order to see the rendered output in the browser, navigate to the folder where index.html is located and double click it. Or right click on it inside VS Code, click Reveal in File Explorer and then double click it.
The rendered result will be as follows:
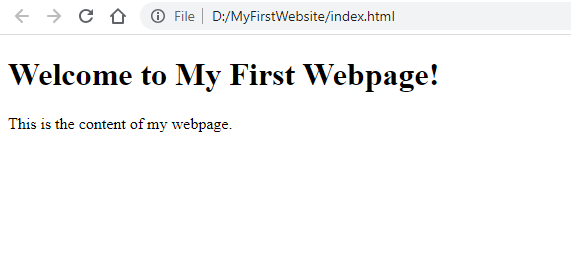
In the above code snippet, we have defined a simple HTML document. The <title> tag inside the <head> section sets the title of the webpage, which is displayed in the browser's title bar or tab. Inside the <body> section, we have an <h1> tag for the main heading and a <p> tag for a paragraph of text.
Now, let's explore some essential HTML tags and their usage.
- The <h1> to <h6> tags are used for headings, with <h1> being the highest level and <h6> the lowest. They help structure the content and provide visual hierarchy.
- The <p> tag is used for paragraphs of text. It separates blocks of text and creates readable content.
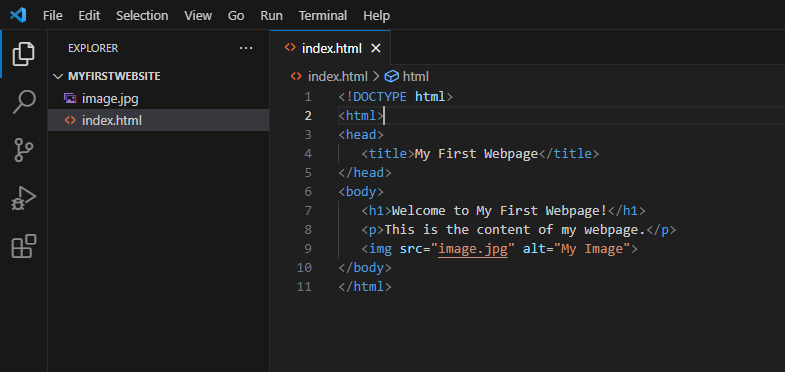
- The <img> tag is used to insert images into web pages. It requires the src attribute to specify the image source.
Let's incorporate these tags into our HTML document:
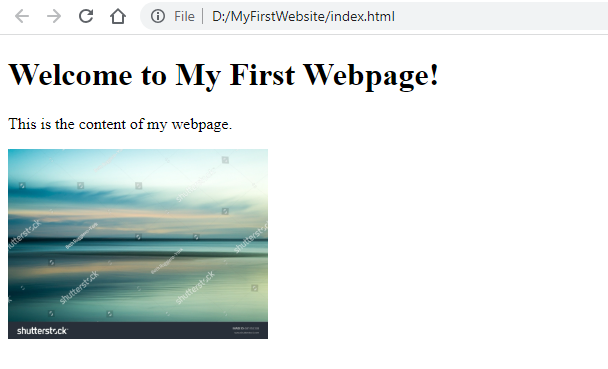
<!DOCTYPE html>
<html>
<head>
   <title>My First Webpage</title>
</head>
<body>
   <h1>Welcome to My First Webpage!</h1>
   <p>This is the content of my webpage.</p>
   <img src="image.jpg" alt="My Image">
</body>
</html>
In the updated code, we have added an <img> tag with the src attribute pointing to an image file named "image.jpg." The alt attribute provides alternative text for the image, which is displayed if the image cannot be loaded or for accessibility purposes.
In order to show an image, make sure to put an image with the name image.jpg inside our website folder, like so:
Once you refresh the browser, or reopen index.html, the output will be rendered like so:
Congratulations! You have successfully created your first HTML document.
In summary, HTML is the foundation of web development, allowing us to structure and present content on the web. By understanding the basic structure of an HTML document and using essential HTML tags, you can create well-organized and visually appealing web pages.
Take some time to experiment with different HTML tags and explore their capabilities. In the next lecture, we will delve deeper into more advanced HTML elements and their usage.
That concludes our lecture on HTML Basics. Happy coding!
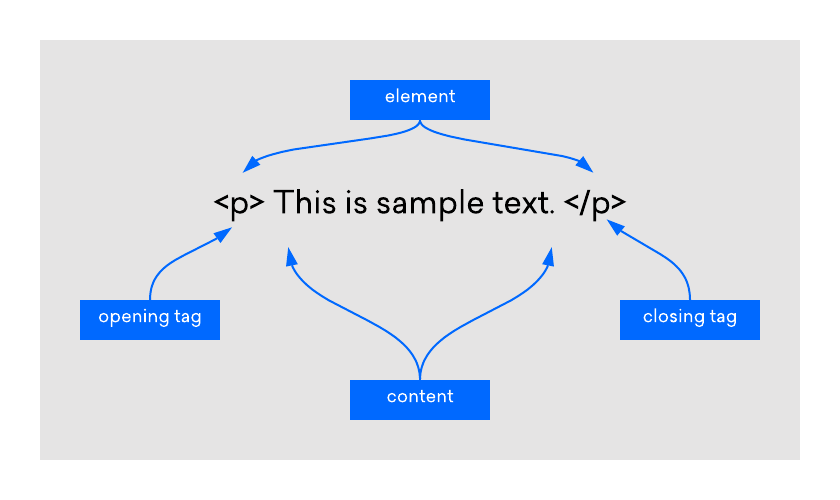
HTML Elements and Tags (High-Level Overview)
HTML is built using elements, which are written using tags. Tags are keywords enclosed in angle brackets that describe the type of content being marked up.
Most HTML elements consist of:
- An opening tag
- Content
- A closing tag
Elements can represent many things, such as headings, paragraphs, links, images, or containers that group content together.
At this stage, it’s important to understand that elements define meaning and structure, not appearance. You’ll explore individual elements and how they work in detail in the next lessons.
Writing Your First HTML Page
Writing HTML doesn’t require special tools. All you need is a text editor and a browser. You write HTML code in a plain text file and save it with an .html extension.
A basic HTML page includes:
- The required document structure
- A title for the page
- Some visible content like headings and paragraphs
Once saved, you can open the file directly in a browser to see the result. This immediate feedback makes HTML an excellent starting point for learning web development.
As you progress, you’ll learn how to organize files, link pages together, and build more complex structures — but every project starts with a simple HTML document.
Common Beginner Mistakes
When learning HTML, beginners often make small mistakes that can lead to confusion. Some common issues include:
- Forgetting to close tags
- Nesting elements incorrectly
- Mixing HTML with styling responsibilities
- Using elements purely for appearance instead of meaning
These mistakes are normal and part of the learning process. The key is to focus on writing clean, readable, and well-structured HTML, even before worrying about design or advanced features.
Learning best practices early will make your future HTML, CSS, and JavaScript work much easier.
What to Learn Next
After understanding the basics of HTML, the next step is to learn how individual HTML elements work in more detail. This includes understanding common elements, how they are used, and how they combine to create real web pages.
From there, you’ll move on to:
- Attributes that add extra information to elements
- Links, lists, tables, and forms
- Semantic HTML and accessibility
- Styling with CSS
HTML is the foundation of everything that follows, so taking the time to understand it properly will pay off throughout your web development journey.