What Is an HTML Attribute?
An attribute is extra information written inside an element’s opening tag. Attributes usually follow this pattern: name="value"
Example (generic pattern)
<tagname attribute="value">Content</tagname>
Attributes:
- Provide additional configuration or meaning
- Often control behavior (like links and forms)
- Are usually written in the opening tag (not the closing tag)
Attribute Syntax and Rules
- All HTML elements can have attributes, but some attributes can be applied to all elements and some are specific to particular elements
- Attributes provide additional information about elements
- Attributes are always specified in the start tag
- Attributes usually come in name/value pairs like: name="value"
- Attribute values are case sensitive, which means that class=”some-name” is not the same as class=”some-Name”
Here are the most important rules beginners should know:
✅ Rule 1: Attributes go in the opening tag
<a href="https://example.com">Visit</a>
✅ Rule 2: Use quotes around values
You’ll usually see double quotes:
<img src="photo.jpg" alt="A photo of a sunset">
Rule 3: Some attributes can exist without a value (boolean attributes)
Example:
<input type="checkbox" checked>
Class Attribute
The class attribute is used to assign a specific class to an element. It is primarily used for styling purposes. By defining a class name and applying CSS styles to that class, you can customize the appearance of multiple elements simultaneously. You can reuse the same class on many elements.
Example:
<h1 class="main-heading">This is a h1 heading</h1>
ID Attribute
The id attribute provides a unique identifier for an element on a webpage. It allows you to target a specific element using CSS, JavaScript, or page links (anchors). Each id must be unique within the HTML document.
Example:
<h1 id="main-heading">This is a h1 heading</h1>
Src Attribute
The src attribute is used with the <img> tag to specify the source URL of an image. It enables you to display images on your webpage. Make sure to provide a valid image file path or URL.
Example:
<img src="images/image1.jpg"/>
Alt Attribute
The alt attribute is used with the <img> tag to provide alternative text for an image. It is displayed if the image fails to load or for accessibility purposes, enabling screen readers to describe the image to visually impaired users.
Example:
<img src="images/image1.jpg" alt="Golden retriever running in a park"/>
Href Attribute
The href attribute is used with the <a> tag to specify the destination URL or location of a hyperlink. It allows you to create clickable links that navigate to other web pages or sections within the same page.
Example:
<a href="https://www.example.com/about.html">About</a>
Title Attribute
The title attribute specifies extra information about an element.
The information is most often shown as a tooltip text when the mouse moves over the element.
Example:
<a href="https://www.example.com/about.html" title="This is an about page">About</a>
Style attribute
The style attribute specifies an inline style for an element. It will override any style set globally, e.g. styles specified in the <style> tag or in an external style sheet.
The style attribute can be used on any HTML element (However, it is not necessarily useful).
In real projects, you’ll usually prefer CSS classes instead of inline styles, but it’s helpful to understand how style works.
Example:
<h1 style="color:blue;text-align:center;">This is a header</h1>
<p style="color:green;">This is a paragraph.</p>
Exercise:
Now, let's see how these attributes can be used in an example.
<!DOCTYPE html>
<html>
<head>
   <title>HTML Attributes</title>
   <style>
      .highlight {
         background-color: yellow;
      }
   </style>
</head>
<body>
   <h1 class="highlight">HTML Attributes</h1>
   <img src="images/image1.jpg" alt="A beautiful image" width="120" height="120">
   <a href="https://www.example.com" title="Some title">Visit Example.com</a>
</body>
</html>
This code will render the following when opened in a browser.
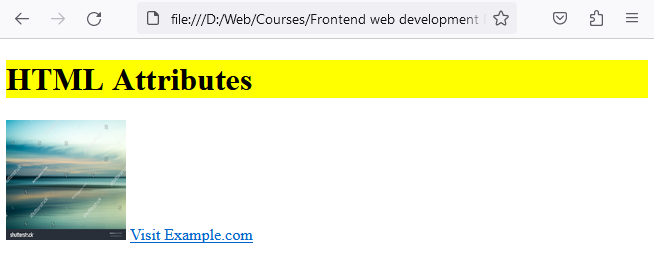
In this example, we've applied the class attribute to the <h1> element, assigning it the class name "highlight." We've also used the src attribute to specify the image source URL and the alt attribute to provide alternative text for the image. Lastly, the href attribute defines the URL destination for the hyperlink.
By using HTML attributes effectively, you can enhance the functionality, appearance, and accessibility of your webpages. In the next lecture, we'll explore HTML links and how they enable users to navigate between web pages.
Congratulations on gaining knowledge about HTML attributes! Continue practicing and experimenting with these attributes to unleash the full potential of your webpages.
Hands-On: Update One Page by Adding Attributes
Here’s a simple example where we add attributes to common elements. Try this in a file like index.html, open it in a browser, then change values and refresh.
<!DOCTYPE html>
<html>
<head>
  <title>HTML Attributes Practice</title>
</head>
<body>

  <h1 id="top">HTML Attributes Practice</h1>

  <p class="info">
    Visit our <a href="https://www.learn-html-css.com/">HTML guide</a>.
  </p>

  <img src="image.jpg" alt="A placeholder image showing an example" width="300">

  <p>
    <a href="#top">Back to top</a>
  </p>

</body>
</html>
What to test (mini checklist)
- Change the href URL and click again
- Change the alt text and imagine it being read by a screen reader
- Change the id and see how it affects the #top jump link
- Change the class value (you’ll style it later with CSS)
Common Beginner Mistakes with Attributes
Mistake 1: Forgetting quotes
<a href=https://example.com>Link</a>
This sometimes works, but it’s not best practice. Use quotes.
Mistake 2: Using the wrong attribute for the element
Example: using href on an image (does nothing).
Mistake 3: Confusing class and id
- id = unique
- class = reusable group
Mistake 4: Writing attributes in the closing tag
Attributes belong in the opening tag only.
What to Learn Next
Now that you understand attributes, you’re ready to use them in real scenarios like:
- Links between pages and sections
- Lists and tables with structured content
- Forms (where attributes become extremely important)
Next lesson: HTML Links — learn how href connects pages, sections, and external sites.”